Difference between revisions of "ESPEasy"
| Line 17: | Line 17: | ||
= Configuration = | = Configuration = | ||
[[File:ESPEasy_Config.png]] | [[File:ESPEasy_Config.png]] | ||
| + | |||
The ESP Easy has a userfriendly web interface for all configuration settings. Main settings can be found under "Config" page. | The ESP Easy has a userfriendly web interface for all configuration settings. Main settings can be found under "Config" page. | ||
| Line 37: | Line 38: | ||
'''Controller Port''' Set the TCP port used on your controller or webservice. | '''Controller Port''' Set the TCP port used on your controller or webservice. | ||
| + | '''Sensor Delay''' Set the delay between sensor reporting in seconds. | ||
| + | |||
| + | '''Sleep Mode''' Tick this field to use the ESP in deepsleep mode for low power operation. | ||
| + | |||
| + | Optional | ||
| + | |||
| + | '''ESP IP''' You can set a static IP for this ESP unit. Set to 0.0.0.0 to use DHCP | ||
| + | |||
| + | '''ESP GW''' If using a static IP, enter the gateway (not needed if no connection to internet is needed!) | ||
| + | |||
| + | '''ESP Subnet''' Enter the local used subnet, usually 255.255.255.0 | ||
| + | |||
| + | '''ESP DNS''' Enter you local DNS server IP address. Usually the IP of your local internet router. | ||
== Get started == | == Get started == | ||
Revision as of 16:01, 19 February 2016
Contents
Introduction
The ESP Easy firmware can be used to turn the ESP module into an easy multifunction sensor device for Home Automation solutions like Domoticz. Configuration of the ESP Easy is entirely web based, so once you've got the firmware loaded, you don't need any other tool besides a common web browser.
The ESP Easy firmware is currently at build R048 an looks stable enough for production purposes as long as it's being used as a sensor device.
ESP Easy also offers limited "low level" actuator functions but due to system instability, this could be less useful in real life applications.
Main page
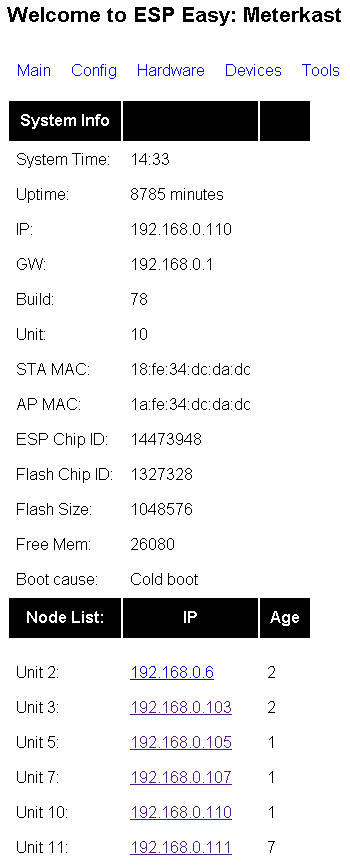
This is an informational page that provides some technical and operational parameters. The bottom half shows a node list of all known ESP units that are running in your network (this is optional and needs to be configured in tools/advanced) The list only shows live systems.
Configuration
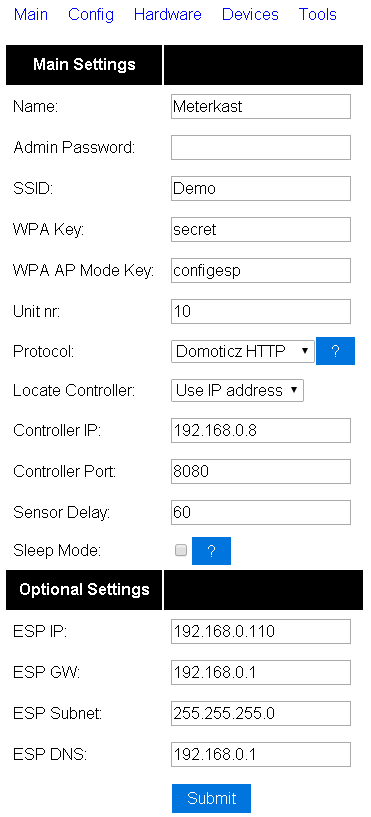
The ESP Easy has a userfriendly web interface for all configuration settings. Main settings can be found under "Config" page.
Name Can be set to an easy to remember name for this system. Can also be used in MQTT communication templates.
Admin Password Can be set if you want to protect your system config with a password.
SSID Wifi network SSID
WPA Key The key used on your Wifi Access Point
Unit nr Each ESP Easy unit needs a unique number in the range 1-31. This is important for MQTT connections and the Node list! Do not forget to set this field to a non-zero value, not conflicting with other units.
Protocol Select the protocol for your Home Automation controller or webservice like ThingSpeak.
Locate Controller You can set the controller based on it's DNS hostname or it's IP address.
Controller IP/Hostname Set IP or hostname for the controller
Controller Port Set the TCP port used on your controller or webservice.
Sensor Delay Set the delay between sensor reporting in seconds.
Sleep Mode Tick this field to use the ESP in deepsleep mode for low power operation.
Optional
ESP IP You can set a static IP for this ESP unit. Set to 0.0.0.0 to use DHCP
ESP GW If using a static IP, enter the gateway (not needed if no connection to internet is needed!)
ESP Subnet Enter the local used subnet, usually 255.255.255.0
ESP DNS Enter you local DNS server IP address. Usually the IP of your local internet router.
Get started
To get you on track with the ESP Easy, we provide a tutorial to demonstrate the basics Tutorial_Domoticz_Switch
For all further applications, please check their respective wiki page Applications
Protocol selection
The ESP Easy supports several Home Automation controllers or web-services that collect sensor data.
Loading firmware
Tutorial Arduino Firmware Upload
Connections
Serial Commands
It is possible to configure your esp Easy by the web graphical interface, you can also use some commands to configure it using the serial console. These commands are provided to assist in emergency situatons where you cannot get access to the web gui.
The following commands can be used by the esp easy.
Delay Set the update interval of your attached devices. "Delay 10" means new values are being sent to your controller every 10 seconds.
Debug Set the debug level. 1: Error 2: Info 3: Debug 4: Debug more. "Debug 4" sets the debug level to debug_more.
IP Set a static ip adres.
WifiSSID Set the SSID of your homenetwork. "WifiSSID yournetworkname"
WifiKey Set the WPA key of your homenetwork "WifiKey yoursecretkey"
WifiAPKey Set the spa key of this esp unit. This key needs to be used by clients when they want to connect in AP modus.
WifiScan Scan for active wifi networks. This can be used to test if your wifi is recognized and to verify whether the wifi part is working or not.
WifiConnect Connect to wifi.
WifiDisConnect Disconnect from your wifi network.
Reboot Reboot esp module
Reset Reset the esp module to it's defaults. It uses the values from the sketch when it's uploaded.
Save Save changes to the esp's EEPROM
Settings Show the current settings stored in the esp's EEPROM


