Difference between revisions of "Tutorial Arduino Firmware Upload"
(Include importance of right folder name) |
|||
| (31 intermediate revisions by 2 users not shown) | |||
| Line 1: | Line 1: | ||
| + | Note thats it might be easier to use Platformio instead of Arduino IDE, although some people have trouble with platformio. (there are still some bugs in it) | ||
| + | |||
| + | For a platformio tutorial look here: [[Tutorial building and uploading with platformio]] | ||
| + | |||
= Download and installing the Arduino IDE = | = Download and installing the Arduino IDE = | ||
| − | Download and install Arduino 1.6. | + | Download and install Arduino 1.6.12. from https://www.arduino.cc/en/Main/Software |
| + | |||
| + | We will make a clean portable install to avoid conflicts with other arduino installs/libraries etc. | ||
| + | |||
| + | Rename arduino-1.6.12 to arduino-1.6.12P230 | ||
| + | |||
| + | Navigate into this folder | ||
| + | |||
| + | Create folder "Portable" | ||
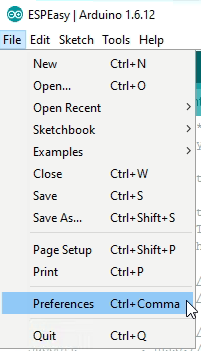
Launch arduino.exe and select preferences | Launch arduino.exe and select preferences | ||
| Line 7: | Line 19: | ||
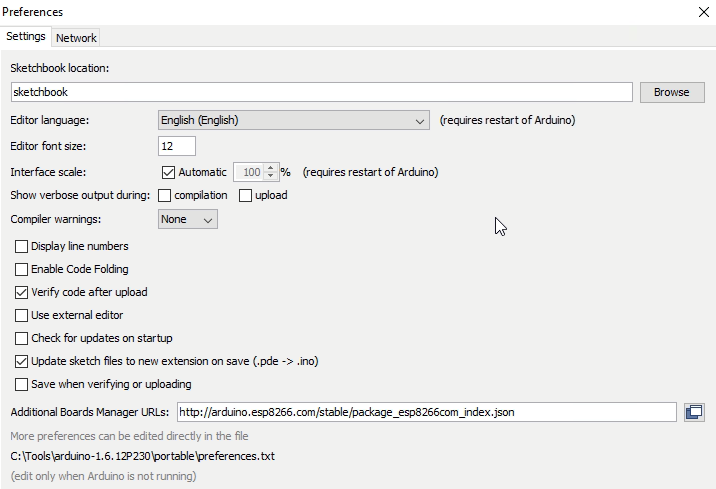
| − | Enter the URL for additional boards. Currently we use | + | Enter the URL for additional boards. Currently we use the 2.3.0. stable version so you should enter: |
http://arduino.esp8266.com/stable/package_esp8266com_index.json | http://arduino.esp8266.com/stable/package_esp8266com_index.json | ||
| Line 19: | Line 31: | ||
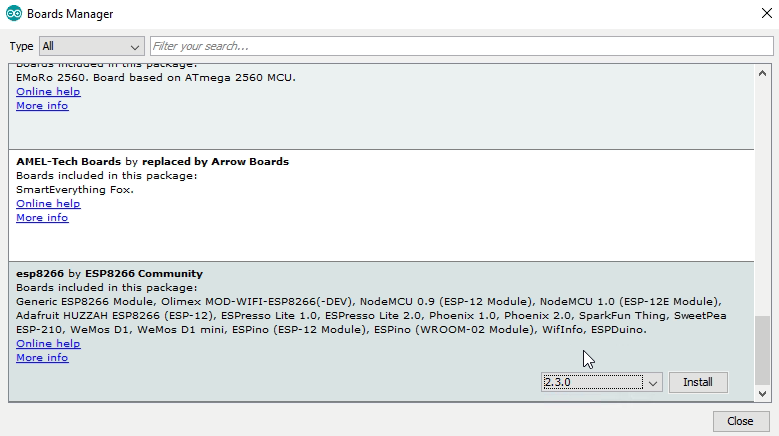
| − | You should see the ESP option | + | You should see the ESP option, select 2.3.0 version |
[[File:Tutorial_Arduino_IDE4.png]] | [[File:Tutorial_Arduino_IDE4.png]] | ||
| Line 29: | Line 41: | ||
= Download ESP Easy Firmware = | = Download ESP Easy Firmware = | ||
| − | Download the latest version | + | Download the latest version at https://github.com/letscontrolit/ESPEasy/releases |
| − | |||
| − | |||
| − | |||
| − | |||
| − | |||
| − | + | The zipfile contains a folder named ''Source'' and that contains two subfolders. Unpack the zipfile to some folder of your own choice and navigate to the ''Source'' folder. | |
| + | == Install libraries == | ||
| − | The | + | The '''lib''' folder has all the libraries you need. The contents look like the screenshot below and should be copied to the Arduino libraries folder: |
[[File:Tutorial_FirmWare_Easy3.png]] | [[File:Tutorial_FirmWare_Easy3.png]] | ||
| − | This is the folder structure for Arduino IDE. You can see the libraries folder in here | + | This is the folder structure for Arduino IDE. You can see the ''libraries'' folder in here: |
[[File:Tutorial_FirmWare_Easy4.png]] | [[File:Tutorial_FirmWare_Easy4.png]] | ||
| − | Once the additional libraries are copied, it should look like this: | + | Once the additional libraries are copied to it, it should something look like this: |
[[File:Tutorial_FirmWare_Easy5.png]] | [[File:Tutorial_FirmWare_Easy5.png]] | ||
| − | = Compile and upload = | + | == Compile and upload == |
| − | Launch Arduino IDE and navigatie to | + | |
| + | Inside the ''Source'' directory rename the '''src''' file to '''ESPEasy'''. Take care of the capital letters in the folder name, otherwise you will end up with compile errors. | ||
| + | |||
| + | Launch Arduino IDE and navigatie to this ESPEasy folder. Open ESPEasy.ino | ||
[[File:Tutorial_FirmWare_Easy6.png]] | [[File:Tutorial_FirmWare_Easy6.png]] | ||
| + | === Selecting the plugin sets === | ||
| − | It's important the select the right ESP board. | + | In version ESPEasy v2 or higher its possible to select different plugin sets. Since we're using Arduino IDE instead of Platformio, its neccesary to select them in ESPEasy.ino. |
| + | |||
| + | In the top of the .ino file you find the defines you can uncomment to enable a plugin set: | ||
| + | //build all the normal stable plugins | ||
| + | //#define PLUGIN_BUILD_NORMAL | ||
| + | |||
| + | //build all plugins that are in test stadium | ||
| + | //#define PLUGIN_BUILD_TESTING | ||
| + | |||
| + | //build all plugins that still are being developed and are broken or incomplete | ||
| + | //#define PLUGIN_BUILD_DEV | ||
| + | |||
| + | Remove the '''//''' from the plugin sets that you want to enable. | ||
| + | |||
| + | === Selecting the correct board === | ||
| + | |||
| + | It's important the select the right ESP board. | ||
| + | |||
| + | NodeMCU boards: If you have a NodeMCU V1.0 board, selection is easy: | ||
[[File:Tutorial_FirmWare_Easy7.png]] | [[File:Tutorial_FirmWare_Easy7.png]] | ||
| + | |||
| + | === Selecting the correct flash size === | ||
| + | |||
| + | In version ESPEasy version 2 the flash size requirements have has changed because we use SPIFFS file-storage now. Also we need to have enough room left to support OTA updates. (over the air updates). | ||
| + | |||
| + | * For 512k boards (like the blue colored ESP-01 or the ESP-12 or ESP-201): Select 64k SPIFFS. | ||
| + | * For 1M boards: Select 128k SPIFFS | ||
| + | * For 4M boards: Select 1M SPIFFS. | ||
| + | |||
| + | If you change these settings ESPEasy will reset to factory defaults. | ||
| + | |||
| + | '''Note: If you upgrade from ESPEasy R148 or earlier to ESPEasy v2.0.0 or later, you will lose all your settings''' | ||
| + | |||
| + | [[File:Tutorial_Firmware_Easy7A.png]] | ||
| + | |||
| + | |||
| + | === Select comport and upload === | ||
And select the right COM port: | And select the right COM port: | ||
| Line 72: | Line 119: | ||
''Please remember to set the esp module in programming mode by pushing '''and holding''' the flash button, and pushing the reset button once.'' | ''Please remember to set the esp module in programming mode by pushing '''and holding''' the flash button, and pushing the reset button once.'' | ||
| + | (but on many recent development boards like the NodeMCU V1.0 this manual interaction is no longer needed) | ||
[[File:Tutorial_FirmWare_Easy9.png]] | [[File:Tutorial_FirmWare_Easy9.png]] | ||
| Line 79: | Line 127: | ||
[[File:Tutorial_FirmWare_Easy10.png]] | [[File:Tutorial_FirmWare_Easy10.png]] | ||
| + | |||
| + | = Updating source files = | ||
| + | If you want to compile newer versions, download the source from github | ||
| + | |||
| + | https://github.com/ESP8266nu/ESPEasy | ||
| + | |||
| + | and copy these folders over the current ones that were obtained with the R120 zipfile. | ||
Latest revision as of 20:42, 11 January 2018
Note thats it might be easier to use Platformio instead of Arduino IDE, although some people have trouble with platformio. (there are still some bugs in it)
For a platformio tutorial look here: Tutorial building and uploading with platformio
Contents
Download and installing the Arduino IDE
Download and install Arduino 1.6.12. from https://www.arduino.cc/en/Main/Software
We will make a clean portable install to avoid conflicts with other arduino installs/libraries etc.
Rename arduino-1.6.12 to arduino-1.6.12P230
Navigate into this folder
Create folder "Portable"
Launch arduino.exe and select preferences
Enter the URL for additional boards. Currently we use the 2.3.0. stable version so you should enter:
http://arduino.esp8266.com/stable/package_esp8266com_index.json
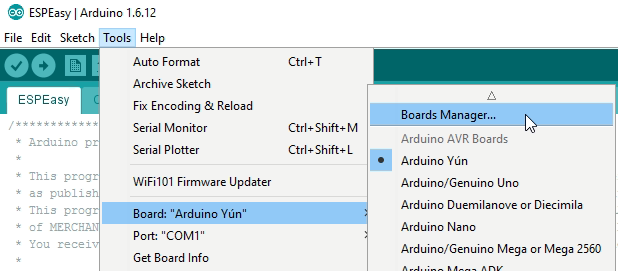
Now navigate to the board manager
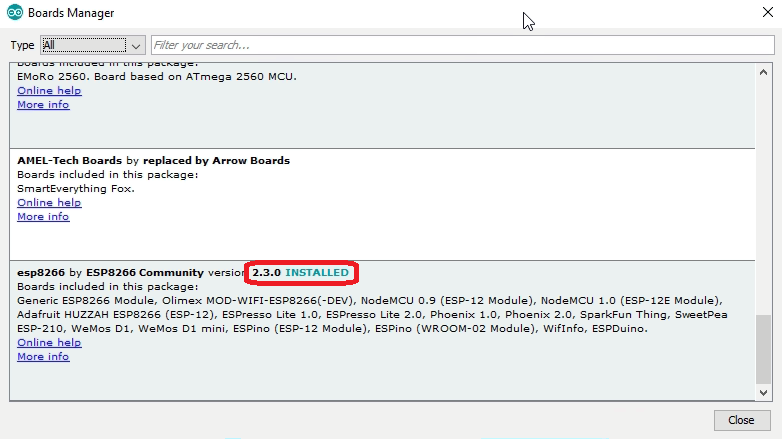
You should see the ESP option, select 2.3.0 version
Click install (this will take some time, be patient, it should download approx. 450 MB)
Download ESP Easy Firmware
Download the latest version at https://github.com/letscontrolit/ESPEasy/releases
The zipfile contains a folder named Source and that contains two subfolders. Unpack the zipfile to some folder of your own choice and navigate to the Source folder.
Install libraries
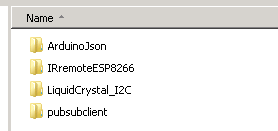
The lib folder has all the libraries you need. The contents look like the screenshot below and should be copied to the Arduino libraries folder:
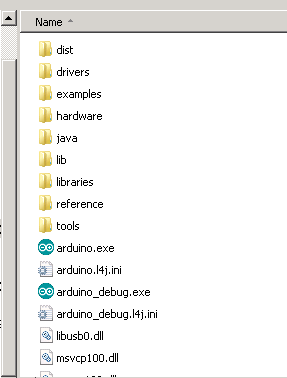
This is the folder structure for Arduino IDE. You can see the libraries folder in here:
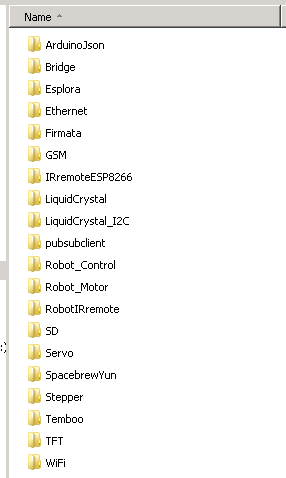
Once the additional libraries are copied to it, it should something look like this:
Compile and upload
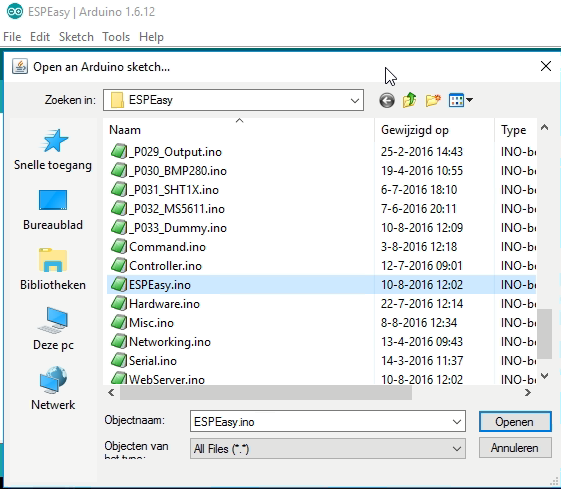
Inside the Source directory rename the src file to ESPEasy. Take care of the capital letters in the folder name, otherwise you will end up with compile errors.
Launch Arduino IDE and navigatie to this ESPEasy folder. Open ESPEasy.ino
Selecting the plugin sets
In version ESPEasy v2 or higher its possible to select different plugin sets. Since we're using Arduino IDE instead of Platformio, its neccesary to select them in ESPEasy.ino.
In the top of the .ino file you find the defines you can uncomment to enable a plugin set:
//build all the normal stable plugins
//#define PLUGIN_BUILD_NORMAL

//build all plugins that are in test stadium
//#define PLUGIN_BUILD_TESTING

//build all plugins that still are being developed and are broken or incomplete
//#define PLUGIN_BUILD_DEV
Remove the // from the plugin sets that you want to enable.
Selecting the correct board
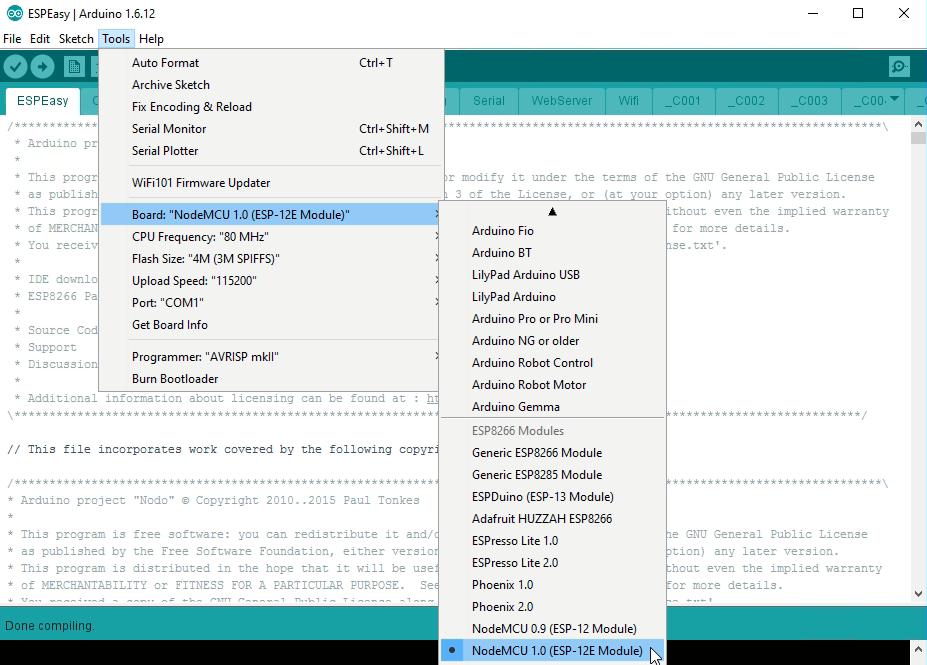
It's important the select the right ESP board.
NodeMCU boards: If you have a NodeMCU V1.0 board, selection is easy:
Selecting the correct flash size
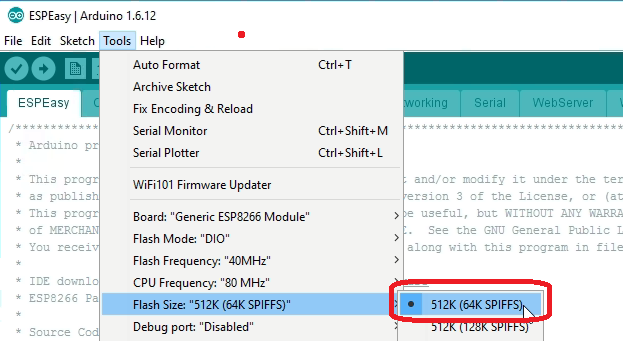
In version ESPEasy version 2 the flash size requirements have has changed because we use SPIFFS file-storage now. Also we need to have enough room left to support OTA updates. (over the air updates).
- For 512k boards (like the blue colored ESP-01 or the ESP-12 or ESP-201): Select 64k SPIFFS.
- For 1M boards: Select 128k SPIFFS
- For 4M boards: Select 1M SPIFFS.
If you change these settings ESPEasy will reset to factory defaults.
Note: If you upgrade from ESPEasy R148 or earlier to ESPEasy v2.0.0 or later, you will lose all your settings
Select comport and upload
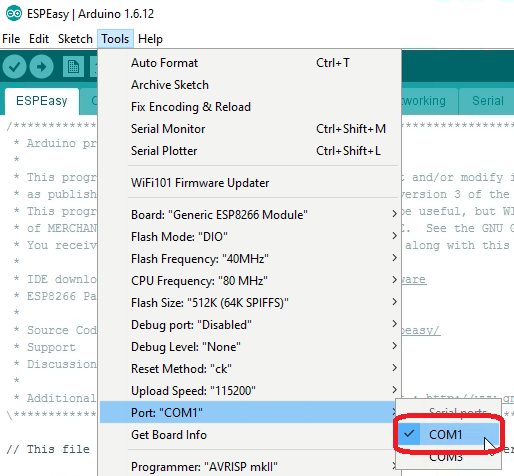
And select the right COM port:
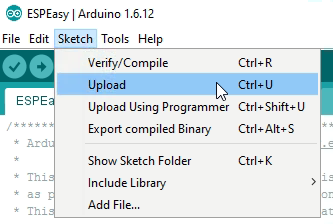
Finally, upload the sketch to your ESP board:
Please remember to set the esp module in programming mode by pushing and holding the flash button, and pushing the reset button once. (but on many recent development boards like the NodeMCU V1.0 this manual interaction is no longer needed)
If all went well, the result in your status window should look like this:
Updating source files
If you want to compile newer versions, download the source from github
https://github.com/ESP8266nu/ESPEasy
and copy these folders over the current ones that were obtained with the R120 zipfile.
