Difference between revisions of "OLEDDisplay"
Grovkillen (talk | contribs) |
|||
| (23 intermediate revisions by 3 users not shown) | |||
| Line 1: | Line 1: | ||
| − | |||
| − | |||
= Introduction = | = Introduction = | ||
The ESP8266 module can be used to control an I2C OLED SSD1306 Display. Mainly to display sensor values locally. | The ESP8266 module can be used to control an I2C OLED SSD1306 Display. Mainly to display sensor values locally. | ||
| Line 9: | Line 7: | ||
= Hardware = | = Hardware = | ||
| − | As you can see, connections are | + | As you can see, connections are easy with this display. The board has only 4 wires: |
[[File:OLED2.png]] | [[File:OLED2.png]] | ||
| Line 20: | Line 18: | ||
LCD ESP-01 | LCD ESP-01 | ||
GND GND | GND GND | ||
| − | VCC | + | VCC VCC |
SDA GPIO 0 | SDA GPIO 0 | ||
SCL GPIO 2 | SCL GPIO 2 | ||
| − | + | Some displays feature a Reset or RST pin. At start-up those displays may show noisy pixels. | |
| + | Resetting the display and thereafter the ESP will help. | ||
| + | NodeMCU for instance, provides a RST pin. Connecting this pin to the RST pin of the OLED is a good way to synchronize operation. | ||
| − | + | Other displays might already be connected to a ESP board. Many of these displays have their reset pin connected to a GPIO. Commonly the pin number 16 is used and in order to get those displays to work properly you need to activate the pull-up for that pin. A quick test is to set the pin to high (1) but for long turn you should enable the pull-up instead. If the pin is missing a pull-up you can add one yourself by soldering a 10k resistor from 3.3V to the pin. | |
| − | + | = ESP Easy = | |
Use the device tab on the ESP Easy webinterface and create a new task by editing one of the available tasks. Select "Display - OLED 1306" from the dropdown box. | Use the device tab on the ESP Easy webinterface and create a new task by editing one of the available tasks. Select "Display - OLED 1306" from the dropdown box. | ||
| Line 37: | Line 37: | ||
[Dallas#Temperature] | [Dallas#Temperature] | ||
| + | |||
| + | With release 057, some features were added. If you put %sysname% or %ip% or %systime% on a line in the table, the display will show either the name you gave the ESP module, its IP address or its time. The latter only when NTP is being deployed. | ||
| Line 45: | Line 47: | ||
(The IDX field will be stuffed with '1', because it's needs a value. But nothing will be send with this device) | (The IDX field will be stuffed with '1', because it's needs a value. But nothing will be send with this device) | ||
| + | |||
| + | = Commands = | ||
| + | |||
| + | {| class="wikitable sortable" | ||
| + | |- | ||
| + | ! Command | ||
| + | ! Value | ||
| + | ! Extra information | ||
| + | |- | ||
| + | |||
| + | | OLED,<row>,<col>,<text> | ||
| + | | - | ||
| + | | Write text messages to OLED screen, ROW for row, COL for starting column, and Text for text. | ||
| + | |- | ||
| + | |||
| + | | OLEDCMD,<value> | ||
| + | | on, off, clear | ||
| + | | Switch on or off the OLED or to clear the display. During the off state, the content will be updated according to the latest values or states. | ||
| + | |- | ||
| + | |} | ||
| + | |||
| + | = Special characters = | ||
| + | |||
| + | {| class="wikitable sortable" | ||
| + | |- | ||
| + | ! Name | ||
| + | ! Character | ||
| + | ! Code (generic) | ||
| + | ! Code (html) | ||
| + | ! Code (verbose) | ||
| + | ! Extra information | ||
| + | |- | ||
| + | |||
| + | | Degree | ||
| + | | ˚ | ||
| + | | {D} | ||
| + | | &deg; | ||
| + | | degreeC<br>degree_C | ||
| + | | "degreeC" and "degree_C" will give you ˚C | ||
| + | |- | ||
| + | |||
| + | | Angle quotes (L/R) | ||
| + | | «<br>» | ||
| + | | {<<}<br>{>>} | ||
| + | | &laquo;<br>&raquo; | ||
| + | | - | ||
| + | | - | ||
| + | |- | ||
| + | |||
| + | | Greek mu | ||
| + | | µ | ||
| + | | {u} | ||
| + | | &micro; | ||
| + | | - | ||
| + | | - | ||
| + | |- | ||
| + | |||
| + | | Currency | ||
| + | | €<br>¥<br>£<br>¢ | ||
| + | | {E}<br>{Y}<br>{P}<br>{c} | ||
| + | | &euro;<br>&yen;<br>&pound;<br>&cent; | ||
| + | | - | ||
| + | | - | ||
| + | |- | ||
| + | |||
| + | | Math symbols | ||
| + | | <span style="color: #A3BABF">x</span>¹<br><span style="color: #A3BABF">x</span>²<br><span style="color: #A3BABF">x</span>³<br>¼<br>½<br>¾<br>±<br>×<br>÷ | ||
| + | | {^1}<br>{^2}<br>{^3}<br>{1_4}<br>{1_2}<br>{3_4}<br>{+-}<br>{x}<br>{..} | ||
| + | | &sup1;<br>&sup2;<br>&sup3;<br>&frac14;<br>&frac12;<br>&frac34;<br>&plusmn;<br>&times;<br>&divide; | ||
| + | | - | ||
| + | | - | ||
| + | |- | ||
| + | |} | ||
Latest revision as of 23:24, 24 March 2018
Introduction
The ESP8266 module can be used to control an I2C OLED SSD1306 Display. Mainly to display sensor values locally.

We currently only support text messages, 8 lines of 16 characters.
Hardware
As you can see, connections are easy with this display. The board has only 4 wires:

Connect the OLED Display to the I2C interface. This display works with 3V3 and can be connected directly to the ESP module.
Connections
 LCD 	 	ESP-01
 GND 	 	GND
 VCC    	VCC
 SDA		GPIO 0
 SCL		GPIO 2
Some displays feature a Reset or RST pin. At start-up those displays may show noisy pixels. Resetting the display and thereafter the ESP will help. NodeMCU for instance, provides a RST pin. Connecting this pin to the RST pin of the OLED is a good way to synchronize operation.
Other displays might already be connected to a ESP board. Many of these displays have their reset pin connected to a GPIO. Commonly the pin number 16 is used and in order to get those displays to work properly you need to activate the pull-up for that pin. A quick test is to set the pin to high (1) but for long turn you should enable the pull-up instead. If the pin is missing a pull-up you can add one yourself by soldering a 10k resistor from 3.3V to the pin.
ESP Easy
Use the device tab on the ESP Easy webinterface and create a new task by editing one of the available tasks. Select "Display - OLED 1306" from the dropdown box.
Enter template texts into lines 1 to 8. Plain text will be shown on the display exactly as entered. If you want to show a value, enclose <task name> and <value name> between brackets, separated by a hashtag.
So if you have a dallas sensor running, with taskname "Dallas", to get the temperature value, use this:
[Dallas#Temperature]
With release 057, some features were added. If you put %sysname% or %ip% or %systime% on a line in the table, the display will show either the name you gave the ESP module, its IP address or its time. The latter only when NTP is being deployed.
Check this sample on how to get it done:
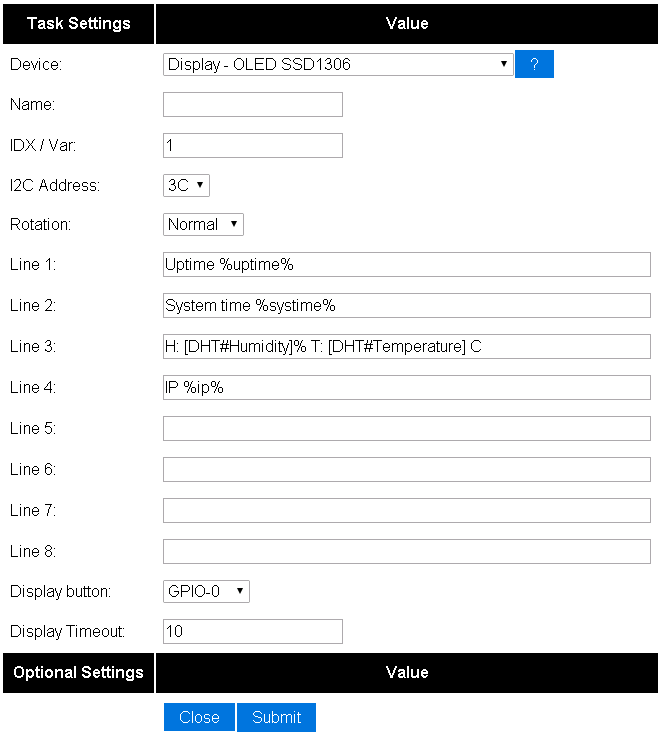

(The IDX field will be stuffed with '1', because it's needs a value. But nothing will be send with this device)
Commands
| Command | Value | Extra information |
|---|---|---|
| OLED,<row>,<col>,<text> | - | Write text messages to OLED screen, ROW for row, COL for starting column, and Text for text. |
| OLEDCMD,<value> | on, off, clear | Switch on or off the OLED or to clear the display. During the off state, the content will be updated according to the latest values or states. |
Special characters
| Name | Character | Code (generic) | Code (html) | Code (verbose) | Extra information |
|---|---|---|---|---|---|
| Degree | ˚ | {D} | ° | degreeC degree_C |
"degreeC" and "degree_C" will give you ˚C |
| Angle quotes (L/R) | « » |
{<<} {>>} |
« » |
- | - |
| Greek mu | µ | {u} | µ | - | - |
| Currency | € ¥ £ ¢ |
{E} {Y} {P} {c} |
€ ¥ £ ¢ |
- | - |
| Math symbols | x¹ x² x³ ¼ ½ ¾ ± × ÷ |
{^1} {^2} {^3} {1_4} {1_2} {3_4} {+-} {x} {..} |
¹ ² ³ ¼ ½ ¾ ± × ÷ |
- | - |