Difference between revisions of "LCDDisplay"
| Line 1: | Line 1: | ||
= Introduction = | = Introduction = | ||
| − | The ESP8266 module can be used to control an I2C LCD Display. | + | The ESP8266 module can be used to control an I2C LCD Display. Mainly to display sensor values locally. |
= Hardware = | = Hardware = | ||
Revision as of 15:27, 11 October 2015
Contents
Introduction
The ESP8266 module can be used to control an I2C LCD Display. Mainly to display sensor values locally.
Hardware

Connect the LCD Display to the I2C interface. This display works with 5 volt VCC, but the I2C connections should be "floating". The 2004 display from "Funduino" that we used in our testlab could be connected without levelshifters.
Connections
WARNING: Some LCD Modules might have pullup resistors to 5 volts VCC. In that case a levelshifter should be used
 LCD 	 	ESP-01
 GND 	 	GND
 VCC    	-
 SDA		GPIO 0
 SCL		GPIO 2
Software
Custom sketch
ESP Easy
Use the device tab on the ESP Easy webinterface and create a new task by editing one of the available tasks. Select "LCD Display" from the dropdown box.
Enter template texts into lines 1 to 4. Plain text will be shown on the display exactly as entered. If you want to show a value, enclose <task name> and <value name> between brackets, separated by a hashtag.
So if you have a dallas sensor running, with taskname "Dallas", to get the temperature value, use this:
[Dallas#Temperature]
Check this sample on how to get it done:
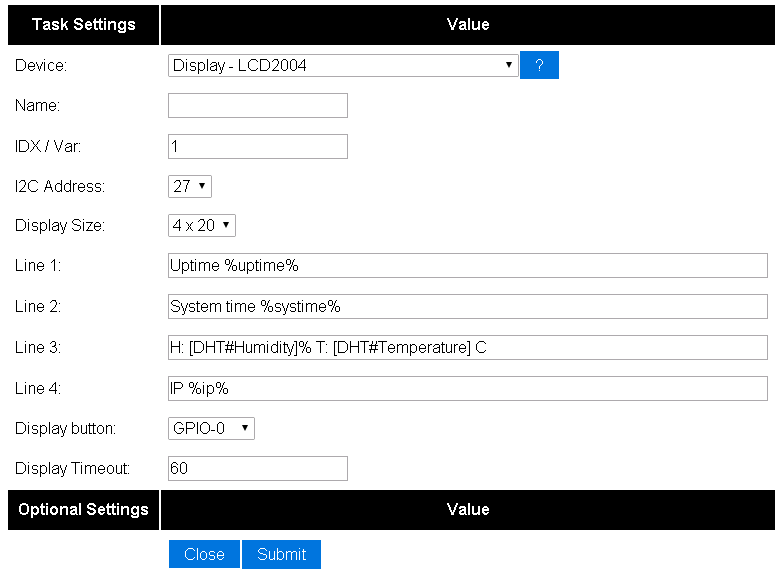

(The IDX field will be stuffed with '1', because it's needs a value. But nothing will be send with this device)
ESP Connexio
Command:
LCDI2CWrite <line>,<column position>, <data command>, <data option>
| Parameter: | Description: | Range: | Comments: |
|---|---|---|---|
| Line | Linenumber | 1-2 (of 1-4) | |
| Column | Column position | 1-16 (1-20) | |
| data command | Message, Clock, IP, PortInput, Variable, Event | ||
| data option | In case of Message: label id of text to be shown | Message:1-20 |
Sample
LCDWrite 1,1,Message,1