Difference between revisions of "Plugin75"
m |
|||
| Line 101: | Line 101: | ||
page0.j1.val=rssibar | page0.j1.val=rssibar | ||
| + | |||
| + | |||
== Interval Options == | == Interval Options == | ||
Revision as of 01:29, 31 July 2018
Nextion Color Touch Panel Information
The Nextion display is offered in two different product families, Basic and Enhanced. Display sizes for both families ranges from 2.4-inches (6cm) to 7.0-inches (18cm). The Enhanced version has all the capabilities of the basic model, but has more memory and includes I/O capabilities. Please note that the examples shown in this wiki have been tested on the basic version.
Here's a short YouTube video that shows examples of what you can do with a Nextion display: https://www.youtube.com/watch?time_continue=6&v=FMWQ1dXZr2I
For a quick introduction to developing a Nextion application please visit: https://www.letscontrolit.com/wiki/index.php/NEXTIONDisplay
Important Information
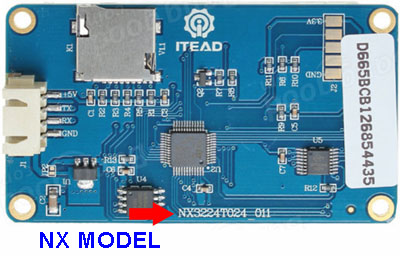
In addition to the two product families, there are also region specific models. More specifically, there's the Chinese market TJC series (supported by tjc1688.com) and the NX model series (supported by iteadstudio.com) that's for the general global market. The TJC site is Chinese language, the ITEAD Studio site is English.
Be aware that some sellers do not specifically mention the exact model number so avoid disappointment by choosing a different supplier. To be blunt, unless you have a project that specifically requires the Chinese market TJC display, our recommendation is to use the global market NX series.
Revision Information
This wiki information has been updated to include the hardware UART serial features that were added late 2018.
Contents
- 1 Device Settings
- 2 Sensor Settings
- 3 Enhanced Serial Communications, General Information
- 4 Enhanced Serial Communications, Settings
- 5 Lines Command Strings (Optional Custom Configuration)
- 6 Interval Options
- 7 Data Acquisition
- 8 Values
- 9 Nextion Command Summary
- 10 Nextion IDE Development / User MCU Input
Device Settings
Device: Display - Nextion
Name: The user assigned name must be NEXTION. This limitation will be removed in the future, but for now please do NOT enter any other name.
Enabled: This checkbox must be selected to enable the Nextion plugin.
Sensor Settings
Internal PullUp: For typical installations this checkbox should be selected.
GPIO ** RX ← : Select the ESP8266's RxD pin. This connects to the Nextion's TX pin.
GPIO ** TX → : Select the ESP8266's TxD pin. This connects to the Nextion's RX pin.
Note: ** = "SS" when Soft Serial is enabled; ** = "HW" when Hardware serial is enabled.
Enhanced Serial Communications, General Information
ESPEasy's required serial communication with the Nextion display can be performed two ways: Soft Serial (bit-bang) or Hardware Serial (UART). Both the Nextion and ESP8266 utilize 3.3V logic, so RX / TX voltage level conversion is not required.
Soft Serial is fixed at 9600 baud and it supports a variety of ESP8266 I/O pins. However, reliability of receiving characters sent from the Nextion may suffer due to ESPEasy's background interrupt conflicts. So using this method requires extra coding to ensure that ESPEasy correctly receives Nextion's serial data.
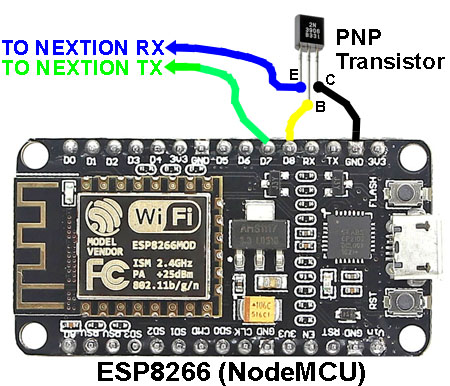
Hardware Serial is extremely reliable and can support a variety of baud rates. It is limited to the D7 (RX) and D8 (TX) pins. Furthermore, it requires disabling ESPEasy's serial log feature; This is automatically done when hardware serial is chosen. Most importantly, because it uses ESP8266's D8 pin a transistor buffer is required to isolate the ESP8266 from the Nextion's RX input circuity. Omitting the transistor will prevent the ESP8266 from booting correctly!
Advice Tip: Despite the extra work, the hardware serial method is strongly recommended.
Below is an example of the transistor's wiring on a NodeMCU board (consult your specific ESP8266 documentation for its pin-out details). The transistor can be nearly any general purpose BJT switching type, such as 2N3906 or PN2907.
 IMPORTANT: A buffer transistor is required when pin D8 is used as the serial Tx pin.
Enhanced Serial Communications, Settings
Use Hardware Serial: Select this checkbox when hardware serial is wanted.
Note: When hardware serial is used do NOT enable the Serial Log file on Tools->Advanced->Serial Port. Also, D7 must be RX, D8 must be TX. Otherwise soft serial must be used.
Important: When ESP8266 pin D8 is used the transistor buffer must be installed.
Baud Rate: Select required serial baud rate. This setting applies only to hardware serial.
Note: Nextion factory default is 9600 baud.
Lines Command Strings (Optional Custom Configuration)
Line N: Up to twelve different Nextion command statements can be entered that automatically execute at each timer interval. This provides a convenient way to periodically populate your Nextion display with data from the ESPEasy system variables. System variables are discussed here: https://www.letscontrolit.com/wiki/index.php/ESPEasy_System_Variables
For example, entering statement
page7.t0.txt="IP: %ip%"
would send the ESPEasy IP address to Nextion's text attribute 0 on page 7. Or entering
page7.t1.txt="IP: %rssi%"
would send the RSSI dBm value to text attribute 1 on page 7.
The Nextion plugin provides an optional conversion for the RSSI value that is designed specifically for Nextion's Progress Bar attribute. Instead of using the %rssi% system variable, the RSSI dBm value can be converted to a 0-100 progress gauge value by substituting rssibar. Here's an example:
page0.j1.val=rssibar
Interval Options
TBD
Data Acquisition
TBD
Values
TBD
Nextion Command Summary
TBD
Nextion IDE Development / User MCU Input
TBD
