User:Rudy Bear
I'm attempting to use Sonoff hardware with the ESP-Easy firmware as a route to simple home automation, and data collection
Contents
Background - why am I doing this
I currently use a Raspberry Pi (RPi) to control my Central Heating. I have a series of (hardwired) temperature sensors in a few rooms in my house, the central heating boiler is controlled via a relay on the old thermostat wires, and I have a single solenoid controlled radiator value.
The RPi senses the temperature sensors every minute, and depending on the time of day and the temperature will activate the relay thus starting the boiler.
My living room heats up quite quickly due to a large radiator, and this switches off the Central Heating leaving other rooms colder than I'd like, so I've replaced the standard thermostatic radiator valve (TRV) in the living room with a valve that can be switched via a relay.
The system has been working well for the last year or so, and I've slowly added extra sensors and features, including an external temperature sensor and an atmospheric pressure sensor. My Central Heating control became sentient, and now tweets data - SwanPondWeather.
What irritates me is the large box that houses the relays and the fact that I have 240v (admittedly in a secure screwed down box) quite close to the RPi.
This page tries to describe my move to wifi controlled switches


Safety
The Sonoff boxes are quite small, and they have 240v running though them - If you don't know what you're doing, that will kill you. I will describe the modification that I've made to the Sonoff boxes, but this requires a small amount of soldering skill. If you're not confident that you can do this, then enjoy reading about the experience, but don't be tempted to get out that soldering iron.
- When flashing the Sonoff, always use the 3.3v pin, always disconnect the 240v supply
- Always ensure the Sonoof is reassembled in it's box before connecting the 240v supply
Opening up the Sonoff
Disconnect everything before attempting to open it up.
Luckily opening up a Sonoff is really easy - if you have protruding fingernail, you can use that to split the two parts the the case apart.
There is a little paper tamper maker on the side, so if you open it then your warranty is null and void.
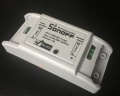
The Sonoff

Cracking it open
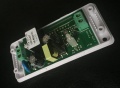
Opened up


Soldering the header
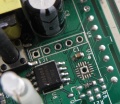
To be able to do anything useful with the Sonoff we have to be able to flash the Sonoff with the ESP-Easy software, and to do that we need to be able to connect the Sonoff to something! To make that easier we're going to solder some pins onto the circuit board.
The circuit board designer has made this fairly easy by giving us a row of standard pitch holes that we can connect some header pins.
I purchased the pins from eBay (search for SIL 2.54mm header) - broke off 5 pins, and then dug out the soldering iron. You have to solder from the other side, so it's a good idea to hold the pins in place with some sticky tape, so that when you turn it to start soldering they don't just fall out!

Five pins ready to go
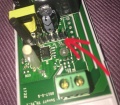
Where the pins are going
All done


Great - so what does that get you? Firstly a way of safely powering the Sonoff with 3.3v while flashing the firmware (so much better than 240v), secondly the tx and rx lines to send the new firmware down, and thirdly (as a bonus) GPIO14 - and we're going to use this later in the project.
| Pin Number | Name | Notes |
|---|---|---|
| 1 | 3.3v | |
| 2 | TX | |
| 3 | RX | |
| 4 | Ground | |
| 5 | GPIO14 |