Difference between revisions of "Tutorial ESPEasy Firmware Upload"
(Created page with "When you buy the ESP module it will most likely have the factory AT or NodeMCU (LUA) firmware inside. To get the ESP Easy running, you need to replace the firmware with the ES...") |
|||
| (17 intermediate revisions by 4 users not shown) | |||
| Line 3: | Line 3: | ||
This can be done with a special flash upload tool that uses the ESP serial interface. You can download the latest stable ESP Easy build from our website. This downloadable zipfile contains the flash tool, a command batchfile to launch the actual flash process and three versions of the binary firmware image. | This can be done with a special flash upload tool that uses the ESP serial interface. You can download the latest stable ESP Easy build from our website. This downloadable zipfile contains the flash tool, a command batchfile to launch the actual flash process and three versions of the binary firmware image. | ||
| − | + | = Know your hardware = | |
| + | It's important to understand the hardware of your module. Some have USB to serial build in, some have not. Some modules can be flashed with an auto-reset mechanism, some need to be put in flash mode manually. | ||
| + | Also make sure that you know the flash size of the ESP module that you're going to flash with the firmware as you need the right firmware file for this particular module. | ||
| + | |||
| + | The ESPEasy 2.0 or ESPEasy Mega firmware will not work on the smaller devices, you'll need the 4096k modules. | ||
| + | |||
| + | = Flash size = | ||
Some information on well known modules: | Some information on well known modules: | ||
| − | 512k Modules | + | ==512k Modules== |
| − | ESP-01 blue colored modules | + | It is best to avoid buying these modules. They will most probably not supported in future versions of ESP Easy. OTA is not possible. |
| − | ESP-201 modules | + | ESP-01 blue colored modules [[file:ESP-01.png]] |
| − | ESP- | + | ESP-201 modules [[file:ESP-201.png]] |
| − | ESP- | + | ESP-12 modules [[file:ESP-12.png]] |
| − | ESP- | + | |
| + | ==1024k Modules== | ||
| + | |||
| + | ESP-01 black colored modules [[file:ESP-01_1M.png]] | ||
| + | Itead Sonoff (1 channel, 4+5 pin versions) | ||
| + | |||
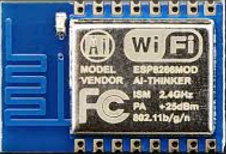
| + | ==4096k Modules== | ||
| + | |||
| + | ESP-12E modules [[file:ESP-12E.png]] | ||
| + | NodeMCU development board V1 [[file:NodeMCU_V1.png]] | ||
| + | Wemos D1 and Wemos D1 Mini | ||
| + | |||
| + | = Connecting the module = | ||
| + | For your first experience with ESP Easy, we recommend the NodeMCU V1 development board, because it has a build in USB to Serial convertor and can be programmed without manual intervention. | ||
| + | |||
| + | This module requires CP2102 drivers on your host before the COM port will be recognized. Download and install these drivers before connecting the board to your computer. | ||
| + | |||
| + | The ESP-01 needs an external USB to Serial board to upload the firmware. Well known are FT232, PL2302, CP2102 based modules. Make sure you install the right drivers first. | ||
| + | |||
| + | To make life easier for ESP-01 you can also use this board that has a CP2102 convertor and auto-reset circuitry for ESP-01: | ||
| + | |||
| + | [[file:ESP01_CP2102.png]] | ||
| + | |||
| + | = Flashing the module = | ||
| + | Step 1 - Find the right flash size of your module | ||
| + | Step 2 - Download the zipfile here: [[ESPEasy#Loading_firmware|ESPEasy - loading firmware]] and unpack to a folder of choice. | ||
| + | Step 3 - Double Click "flash.cmd". A command windows should start with three questions. | ||
| + | Step 4 - Select the com port that your module or FTDI module is using | ||
| + | Step 5 - Select the flash size, 512, 1024 or 4096 | ||
| + | Step 6 - Select the build version like 120 or newer. | ||
| + | |||
| + | After successful uploading, reboot the ESP module (press reset if you have a button or power off/power on the module) | ||
| + | |||
| + | The ESP module should start a Wifi Access point named ESP_0 | ||
| − | + | == Flash scripts == | |
| − | |||
| − | + | The zip file contains the esptool and a script for Windows, a similar bash script for Linux is available on the [[flash script linux]] page. | |
| − | |||
| − | |||
| − | |||
| − | + | = Setup = | |
| − | + | Proceed to your first setup: [[EasySetup]] | |
| − | |||
| − | |||
| − | |||
| − | |||
Latest revision as of 20:46, 18 April 2017
When you buy the ESP module it will most likely have the factory AT or NodeMCU (LUA) firmware inside. To get the ESP Easy running, you need to replace the firmware with the ESP Easy firmware first.
This can be done with a special flash upload tool that uses the ESP serial interface. You can download the latest stable ESP Easy build from our website. This downloadable zipfile contains the flash tool, a command batchfile to launch the actual flash process and three versions of the binary firmware image.
Contents
Know your hardware
It's important to understand the hardware of your module. Some have USB to serial build in, some have not. Some modules can be flashed with an auto-reset mechanism, some need to be put in flash mode manually.
Also make sure that you know the flash size of the ESP module that you're going to flash with the firmware as you need the right firmware file for this particular module.
The ESPEasy 2.0 or ESPEasy Mega firmware will not work on the smaller devices, you'll need the 4096k modules.
Flash size
Some information on well known modules:
512k Modules
It is best to avoid buying these modules. They will most probably not supported in future versions of ESP Easy. OTA is not possible.
ESP-01 blue colored modulesESP-201 modules
ESP-12 modules


1024k Modules
ESP-01 black colored modules 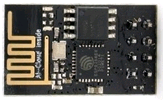 Itead Sonoff (1 channel, 4+5 pin versions)

4096k Modules
ESP-12E modulesNodeMCU development board V1
Wemos D1 and Wemos D1 Mini


Connecting the module
For your first experience with ESP Easy, we recommend the NodeMCU V1 development board, because it has a build in USB to Serial convertor and can be programmed without manual intervention.
This module requires CP2102 drivers on your host before the COM port will be recognized. Download and install these drivers before connecting the board to your computer.
The ESP-01 needs an external USB to Serial board to upload the firmware. Well known are FT232, PL2302, CP2102 based modules. Make sure you install the right drivers first.
To make life easier for ESP-01 you can also use this board that has a CP2102 convertor and auto-reset circuitry for ESP-01:

Flashing the module
Step 1 - Find the right flash size of your module
Step 2 - Download the zipfile here: ESPEasy - loading firmware and unpack to a folder of choice.
Step 3 - Double Click "flash.cmd". A command windows should start with three questions.
Step 4 - Select the com port that your module or FTDI module is using
Step 5 - Select the flash size, 512, 1024 or 4096
Step 6 - Select the build version like 120 or newer.
After successful uploading, reboot the ESP module (press reset if you have a button or power off/power on the module)
The ESP module should start a Wifi Access point named ESP_0
Flash scripts
The zip file contains the esptool and a script for Windows, a similar bash script for Linux is available on the flash script linux page.
Setup
Proceed to your first setup: EasySetup