WemosMotorshield
Contents
Introduction
As of 15.03.2019 this plugin is available in Mega [NORMAL] build github
Plugin 079: Motor - Wemos Motorshield
The Plugin is included with ESPEasy's [NORMAL] Mega branch. https://www.letscontrolit.com/wiki/index.php/Official_plugin_list
The Plugin is compatible with the Wemos Motor Shield which is controlled over the I2C protocol. https://docs.wemos.cc/en/latest/d1_mini_shiled/motor.html
Hardware
The Wemos Motor Shield is designed to plug onto the Wemos D1 Mini ESP8266 board (https://docs.wemos.cc/en/latest/d1/d1_mini.html). The shield can be used with most other ESP8266 controllers using wire connections (3.3V, Ground, RST, D1 (GPIO5/SCL), D2 (GPIO4/SDA).
Below is an image of the board (Motor Shield V1.0 shown):

There are two hardware version of the Motor Shield board (V1.0 and V2.0). The V1.0 release requires bridging some pads with solder. See photo below for details.

Note: The solder bridges are not required on the Motor Shield V2.0 board.
Installation
Piotr Bugalski has re-written the firmware for the V1.0 Motor Shield. The opensource code is published it at https://github.com/pbugalski/wemos_motor_shield.
The new firmware is compatible with the old one, minus the hanging and crashing, so it should be perfect for a drop-in replacement.
Here is how you can flash it to your shield.
Preparations:
Short the RTS and the 3V pins on the shield together, like this: https://cdn.hackaday.io/images/3123331492797505129.jpg
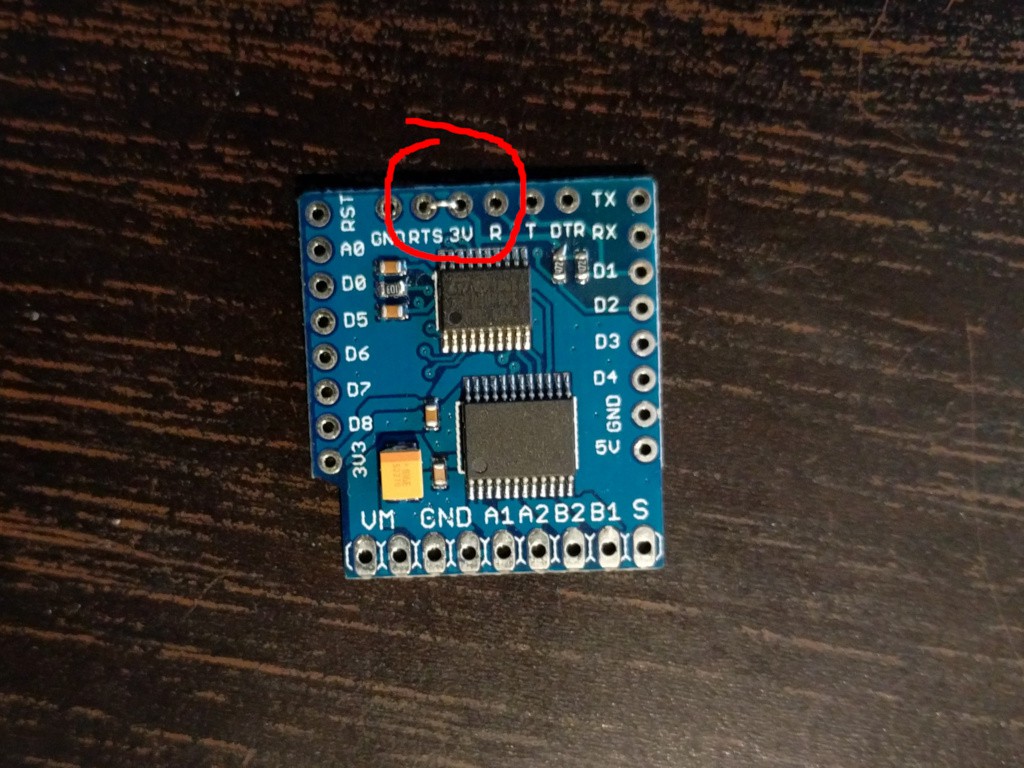
And the connect the main pins of the shield to your USB2TTL as follows:
GND ↔ GND
3V3 ↔ 3V3 (or VCC or whatever it is called on your USB2TTL)
D2 ↔ TX
D1 ↔ RX
and connect it to your computer.

Download the motor_shield.bin:
https://cdn.hackaday.io/files/18439788894176/motor_shield.bin
or
https://github.com/pbugalski/wemos_motor_shield
Download STM32Flash from here https://sourceforge.net/projects/stm32flash/files/
Extract and put the above files into a directory
Plug in your USB serial device and make a note of the COM port it uses
Those of you who want to do this using Window's 8/10:
Window Command Prompt cd to the directory
1) 'stm32flash.exe COM9' replace COM9 with your COM port number
2) 'stm32flash.exe -k COM9' This will unlock your shield
3) 'stm32flash.exe -f -v -w motor_shield.bin COM9' This will flash the bin and re-lock the shield.

Then disconnect all the wires (including the RTS pin), connect the shield to your ESP device (eg. WeMos D1 Mini), and it should work.
see also: https://hackaday.io/project/18439-motor-shield-reprogramming
Software
The Plugin is based on this library: https://github.com/wemos/WEMOS_Motor_Shield_Arduino_Library
ESP Easy
Flash Testing version of ESPeasy in order to used the plugin.
Use the device tab on the ESP Easy webinterface and create a new task by editing one of the available tasks.
Select "Motor - Wemos Motorshield" from the dropdown box.
Enter device name.
Enter the i2c address of you sensor, default value 0x30


Controlling the Motor Shield via HTTP commands
Currently only 2 DC motors are supported. Steppers need to be implemented in future.
You can control the Motorshield by remote http commands send from your Home Automation Controller or any other device that can send http get requests.
| Available commands |
|---|
| Forward |
| Backward |
| Stop |
Command format:
For DC Motors:
http://<ESP IP address>/control?cmd=WemosMotorShieldCMD,<Motornumber>,<Forward/Backward/Stop>,<Speed>
Motornumber:
A=0, B=1
Examples:
Turn on DC Motor, Direction: Forward. Speed is a value from 0-255
http://<ESP IP address>/control?cmd=WemosMotorShieldCMD,0,Forward,99
Stopping the DC Motor:
http://<ESP IP address>/control?cmd=WemosMotorShieldCMD,0,Stop
Controlling the Motor Shield via ESPeasy commands
Go to 'Tools' and enter in command line.
command:
WemosMotorShieldCMD,0,Forward,99
WemosMotorShieldCMD,0,Backward,50
WemosMotorShieldCMD,0,Stop
Rules Example
The Event examples shown below provide basic rules for DoorOpen, DoorClose, and DoorStop.
//Events
On DoorOpen Do
WemosMotorShieldCMD 0 Backward 30
EndOn
On DoorClose Do
WemosMotorShieldCMD 0 Forward 30
EndOn
On DoorStop Do
WemosMotorShieldCMD 0 Stop
EndOn
---
// Timer for all day open door at time if not open
On Clock#Time=All,07:00 do
If [Reed1-open#Switch]!=1
Event,DoorOpen
Else
Event,DoorStop
endif
endon
// Timer for all day close door at time if not closed
On Clock#Time=All,22:00 do
If [Reed2-close#Switch]!=1
Event,DoorClose
Else
Event,DoorStop
endif
endon