Difference between revisions of "WemosMotorshield"
Tungsten E2 (talk | contribs) |
m (Minor corrections) |
||
| (26 intermediate revisions by 2 users not shown) | |||
| Line 1: | Line 1: | ||
| − | ''' | + | |
| + | '''ESPEasy's readthedocs site has more detailed information on using the Motor Shield.''' Please see https://espeasy.readthedocs.io/en/latest/Plugin/P079.html | ||
| + | |||
= Introduction = | = Introduction = | ||
| + | Plugin 079: Motor - Wemos / Lolin Motorshield | ||
| + | |||
| + | This Plugin is included with ESPEasy's [NORMAL] Mega branch (builds after 15.03.2019). https://www.letscontrolit.com/wiki/index.php/Official_plugin_list | ||
| − | Plugin | + | The Plugin is compatible with the Wemos V1.0 Motor Shield. Beginning with the mega-20200929 release (29.09.2020) the Lolin V2.0 Motor Shield is also supported. |
| − | + | https://docs.wemos.cc/en/latest/d1_mini_shiled/motor.html | |
| − | It | + | The Motor Shield connects to the i2c bus (default address is 0x30). It has a TB6612FNG driver chip that can control two DC motors that draw 1.2A or less. Motor supply voltage can range from 2.5VDC to 15.0VDC. There is also a STM32F030 microcontroller onboard that handles the i2c communication for command processing. |
| − | |||
| − | = Hardware = | + | = Supported Hardware = |
| − | + | There are two variations of the Motor Shield. Originally only the Wemos V1.0 Motor Shield was supported. This board requires modification (custom STM32F030 firmware and solder jumpers). | |
| − | + | But in Sep-2020 the ESPEasy plugin was updated to support the Lolin 2.0 Motor Shield. The Lolin Shield requires no modifications which greatly simplifies a new installation. | |
| + | [[File:P079_Motorshields_Top.png|425px|]] | ||
| − | |||
| + | The Motor Shield is designed to plug onto the Wemos D1 Mini ESP8266 board (https://docs.wemos.cc/en/latest/d1/d1_mini.html). The shield can also be used with most other ESP8266 controllers using wire connections (3.3V, Ground, RST, D1 (GPIO5/SCL), D2 (GPIO4/SDA). The image below provides typical wiring details (NodeMCU board shown for reference). | ||
| − | + | [[File:P079_Shield_Wiring.png|450px|]] | |
| − | The new firmware is compatible | + | |
| + | The Wemos V1.0 board requires bridging some pads with solder. See photo below for details. | ||
| + | |||
| + | [[File:Motorshield_600.jpg|300px|]] | ||
| + | |||
| + | |||
| + | Note: The Lolin Motor Shield V2.0 board does not require any modifications. | ||
| + | |||
| + | = Motor Shield Firmware Installation (Wemos V1.0 only) = | ||
| + | |||
| + | |||
| + | Unlike the Lolin V2.0, the Wemos V1.0 requires a firmware upgrade. The factory installed Wemos V1.0 firmware has reliability issues, such as hard lockup (hang) of the I2C bus. When this occurs all I2c communication is lost. A power cycle is required to restore operation! | ||
| + | |||
| + | Piotr Bugalski has re-written the firmware. His open source code is published at https://github.com/pbugalski/wemos_motor_shield. | ||
| + | |||
| + | The new firmware is backwards compatible. Despite the extra work to reflash the Shield’s firmware, the improvements make it an essential upgrade. But If you prefer less work then use the Lolin V2.0 Motor Shield instead. | ||
Here is how you can flash it to your shield. | Here is how you can flash it to your shield. | ||
| Line 31: | Line 51: | ||
Preparations: | Preparations: | ||
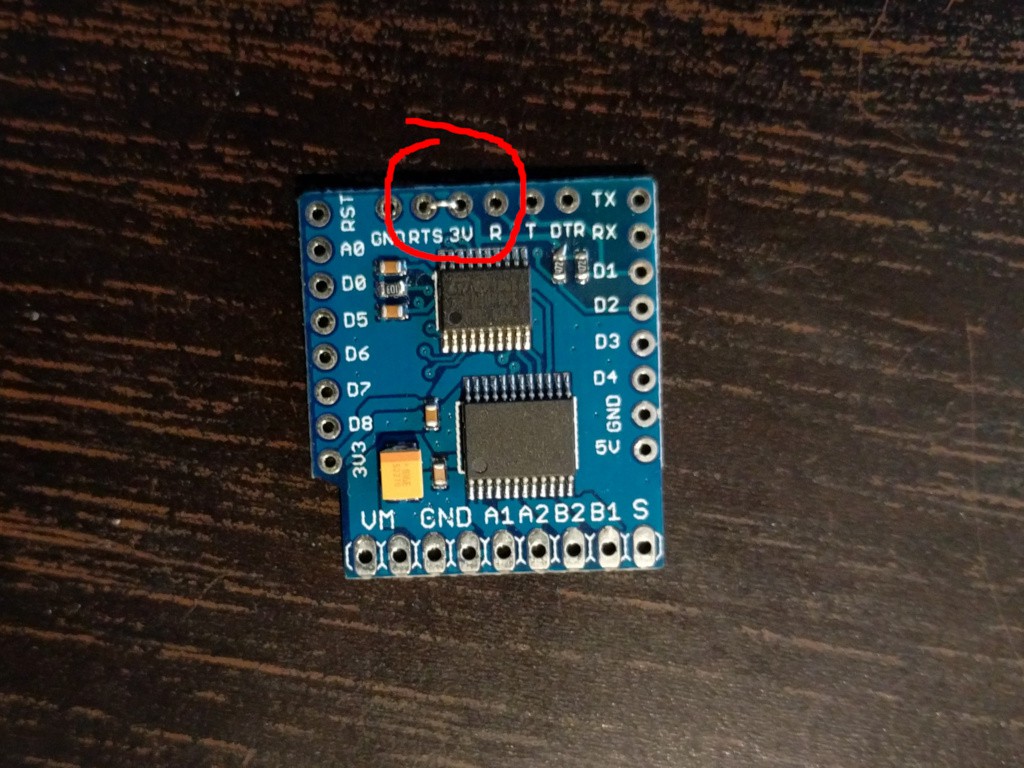
| − | Short the RTS and the 3V pins on the shield together, like this: | + | Short the RTS and the 3V pins on the shield together, like this: https://cdn.hackaday.io/images/3123331492797505129.jpg |
And the connect the main pins of the shield to your USB2TTL as follows: | And the connect the main pins of the shield to your USB2TTL as follows: | ||
| Line 44: | Line 64: | ||
and connect it to your computer. | and connect it to your computer. | ||
| + | |||
| + | [[File:WemosMotorshield04.jpg]] | ||
| Line 66: | Line 88: | ||
Window Command Prompt cd to the directory | Window Command Prompt cd to the directory | ||
| − | 1) stm32flash.exe | + | 1) 'stm32flash.exe COM9' replace COM9 with your COM port number |
| − | 2) stm32flash.exe -k | + | 2) 'stm32flash.exe -k COM9' This will unlock your shield |
| − | 3) stm32flash.exe -f -v -w motor_shield.bin | + | 3) 'stm32flash.exe -f -v -w motor_shield.bin COM9' This will flash the bin and re-lock the shield. |
| + | [[File:WemosMotorshield03.PNG]] | ||
| − | |||
| + | Then disconnect all the wires (including the RTS pin), connect the shield to your ESP device (eg. WeMos D1 Mini), and it should work. | ||
see also: https://hackaday.io/project/18439-motor-shield-reprogramming | see also: https://hackaday.io/project/18439-motor-shield-reprogramming | ||
| − | = Software = | + | = ESPEasy Software = |
| + | This Plugin is included with ESPEasy's [NORMAL] Mega branch (builds after 15.03.2019). The Lolin V2.0 Motor Shield is supported after the 29.09.2020 builds (earlier mega versions only supported the Wemos V1.0 motor shield). | ||
| − | The Plugin | + | The Plugin's motor control functions are based on the Arduino Motor Shield libraries: |
| + | Wemos V1.0: https://github.com/wemos/WEMOS_Motor_Shield_Arduino_Library | ||
| + | Lolin V2.0: https://github.com/wemos/LOLIN_I2C_MOTOR_Library | ||
| − | = ESP Easy = | + | = ESP Easy Device Setup = |
| + | Use the device tab on the ESP Easy web interface and create a new task by editing one of the available tasks. | ||
| − | + | Select "<i>Motor - Wemos/Lolin Motorshield</i>" from the drop down box. | |
| − | + | Enter the Device's <i>Name</i>. Do NOT include spaces or special characters. | |
| − | Select | + | Select the <i>Enabled</i> Checkbox. |
| − | Enter | + | Enter the Motor Shield's <i>I2C Address (Hex)</i>. The Factory Default value is 0x30. |
| − | + | Select the <i>Board Type</i>: Wemos V1.0 or Lolin V2.0 | |
| + | |||
| + | Below is a screenshot of a typical Wemos 1.0 configuration. | ||
| + | |||
| + | [[File:P079_Wemos_Task1.png]] | ||
| + | |||
| + | |||
| + | [[File:P079_Wemos_Device1.png]] | ||
| Line 102: | Line 136: | ||
| − | + | Two DC brushed motors can be controlled by the motor shield. You can control the motors by remote http commands sent from your Home Automation Controller or any other device that can send http get requests. | |
| + | |||
| + | |||
| + | {| class="wikitable" | ||
| + | |- | ||
| + | ! Available Command Actions | ||
| + | |- | ||
| + | |||
| + | | Forward | ||
| + | |- | ||
| + | |||
| + | | Backward | ||
| + | |- | ||
| + | |||
| + | | Stop | ||
| + | |- | ||
| + | |||
| + | | Brake | ||
| + | |- | ||
| + | |||
| + | | Standby | ||
| + | |- | ||
| + | |||
| + | |} | ||
| + | |||
| + | |||
| + | ---- | ||
| + | |||
| + | <b>Command Syntax Format:</b> | ||
| − | + | http://<ESP IP address>/control?cmd=WemosMotorShieldCMD,<Motornumber>,<Action>,<Speed> | |
| + | or | ||
| − | + | http://<ESP IP address>/control?cmd=LolinMotorShieldCMD,<Motornumber>,<Action>,<Speed> | |
| − | |||
| − | + | <b>Command Keyword:</b> | |
| − | + | WemosMotorShieldCMD | |
| + | LolinMotorShieldCMD | ||
| − | + | Note: Both keywords are interchangeable. | |
| − | |||
| − | + | <b>Motornumber:</b> | |
| − | + | 0 = Motor A | |
| + | 1 = Motor B | ||
| − | + | <b>Action:</b> | |
| − | + | Forward = Turn on DC Motor, Direction Forward; Requires speed parameter. | |
| − | + | Backward = Turn on DC Motor, Direction Backward; Requires speed parameter. | |
| + | Stop = Turn off DC Motor, no Brake. | ||
| − | + | Brake = Turn off DC Motor, apply Brake (short commutator). | |
| − | Turn | + | Standby = Turn off DC Motor and set MotorShield to low power mode. |
| − | http://<ESP IP address>/control?cmd= | + | Note: Brake and Standby actions are not available in Mega builds before Sep-29-2020. |
| + | |||
| + | |||
| + | <b>Speed:</b> | ||
| + | |||
| + | 0-100 | ||
| + | |||
| + | Note: 0% - 100% PWM duty cycle. | ||
| + | |||
| + | |||
| + | |||
| + | <b>Examples:</b> | ||
| + | |||
| + | Note: The examples shown below use the <i>WemosMotorShieldCMD</i> keyword. However, both <i>WemosMotorShieldCMD</i> and <i>LolinMotorShieldCMD</i> command keywords are interchangeable. | ||
| + | |||
| + | Turn on DC Motor, Direction: Forward. Speed is a value from 0-100 | ||
| + | |||
| + | http://<ESP IP address>/control?cmd=WemosMotorShieldCMD,0,Forward,99 | ||
Stopping the DC Motor: | Stopping the DC Motor: | ||
| − | http://<ESP IP address>/control?cmd= | + | http://<ESP IP address>/control?cmd=WemosMotorShieldCMD,0,Stop |
| − | = | + | = Controlling the Motor Shield via ESPeasy commands = |
| + | |||
| + | |||
| + | Go to 'Tools' and enter in command line. | ||
| + | |||
| + | |||
| + | command: | ||
| + | |||
| + | WemosMotorShieldCMD,0,Forward,99 | ||
| + | |||
| + | WemosMotorShieldCMD,0,Backward,50 | ||
| − | + | WemosMotorShieldCMD,0,Stop | |
| − | |||
| − | |||
| − | |||
| − | + | = Rules Example = | |
| − | |||
| − | + | The Event examples shown below provide basic rules for DoorOpen, DoorClose, and DoorStop. A pair of switches (requires two Switch input - Switch plugins) are used to limit up/down motor travel. | |
| − | + | ``` | |
| − | + | //Events | |
| + | on DoorOpen Do | ||
| + | WemosMotorShieldCMD,0,Backward,30 | ||
| + | endOn | ||
| − | + | on DoorClose Do | |
| + | WemosMotorShieldCMD,0,Forward,30 | ||
| + | endOn | ||
| − | + | on DoorStop Do | |
| + | WemosMotorShieldCMD,0,Stop | ||
| + | endOn | ||
| − | + | --- | |
| − | + | // Timer for all day open door at time if not open | |
| + | on Clock#Time=All,07:00 do | ||
| + | if [Limit1#Switch]!=1 | ||
| + | event,DoorOpen | ||
| + | else | ||
| + | event,DoorStop | ||
| + | endif | ||
| + | endon | ||
| − | |||
| − | + | // Timer for all day close door at time if not closed | |
| + | on Clock#Time=All,22:00 do | ||
| + | if [Limit2]!=1 | ||
| + | event,DoorClose | ||
| + | else | ||
| + | event,DoorStop | ||
| + | endif | ||
| + | endon | ||
| − | |||
| − | + | ``` | |
Latest revision as of 22:01, 30 September 2020
ESPEasy's readthedocs site has more detailed information on using the Motor Shield. Please see https://espeasy.readthedocs.io/en/latest/Plugin/P079.html
Contents
Introduction
Plugin 079: Motor - Wemos / Lolin Motorshield
This Plugin is included with ESPEasy's [NORMAL] Mega branch (builds after 15.03.2019). https://www.letscontrolit.com/wiki/index.php/Official_plugin_list
The Plugin is compatible with the Wemos V1.0 Motor Shield. Beginning with the mega-20200929 release (29.09.2020) the Lolin V2.0 Motor Shield is also supported.
https://docs.wemos.cc/en/latest/d1_mini_shiled/motor.html
The Motor Shield connects to the i2c bus (default address is 0x30). It has a TB6612FNG driver chip that can control two DC motors that draw 1.2A or less. Motor supply voltage can range from 2.5VDC to 15.0VDC. There is also a STM32F030 microcontroller onboard that handles the i2c communication for command processing.
Supported Hardware
There are two variations of the Motor Shield. Originally only the Wemos V1.0 Motor Shield was supported. This board requires modification (custom STM32F030 firmware and solder jumpers).
But in Sep-2020 the ESPEasy plugin was updated to support the Lolin 2.0 Motor Shield. The Lolin Shield requires no modifications which greatly simplifies a new installation.

The Motor Shield is designed to plug onto the Wemos D1 Mini ESP8266 board (https://docs.wemos.cc/en/latest/d1/d1_mini.html). The shield can also be used with most other ESP8266 controllers using wire connections (3.3V, Ground, RST, D1 (GPIO5/SCL), D2 (GPIO4/SDA). The image below provides typical wiring details (NodeMCU board shown for reference).

The Wemos V1.0 board requires bridging some pads with solder. See photo below for details.

Note: The Lolin Motor Shield V2.0 board does not require any modifications.
Motor Shield Firmware Installation (Wemos V1.0 only)
Unlike the Lolin V2.0, the Wemos V1.0 requires a firmware upgrade. The factory installed Wemos V1.0 firmware has reliability issues, such as hard lockup (hang) of the I2C bus. When this occurs all I2c communication is lost. A power cycle is required to restore operation!
Piotr Bugalski has re-written the firmware. His open source code is published at https://github.com/pbugalski/wemos_motor_shield.
The new firmware is backwards compatible. Despite the extra work to reflash the Shield’s firmware, the improvements make it an essential upgrade. But If you prefer less work then use the Lolin V2.0 Motor Shield instead.
Here is how you can flash it to your shield.
Preparations:
Short the RTS and the 3V pins on the shield together, like this: https://cdn.hackaday.io/images/3123331492797505129.jpg
And the connect the main pins of the shield to your USB2TTL as follows:
GND ↔ GND
3V3 ↔ 3V3 (or VCC or whatever it is called on your USB2TTL)
D2 ↔ TX
D1 ↔ RX
and connect it to your computer.

Download the motor_shield.bin:
https://cdn.hackaday.io/files/18439788894176/motor_shield.bin
or
https://github.com/pbugalski/wemos_motor_shield
Download STM32Flash from here https://sourceforge.net/projects/stm32flash/files/
Extract and put the above files into a directory
Plug in your USB serial device and make a note of the COM port it uses
Those of you who want to do this using Window's 8/10:
Window Command Prompt cd to the directory
1) 'stm32flash.exe COM9' replace COM9 with your COM port number
2) 'stm32flash.exe -k COM9' This will unlock your shield
3) 'stm32flash.exe -f -v -w motor_shield.bin COM9' This will flash the bin and re-lock the shield.

Then disconnect all the wires (including the RTS pin), connect the shield to your ESP device (eg. WeMos D1 Mini), and it should work.
see also: https://hackaday.io/project/18439-motor-shield-reprogramming
ESPEasy Software
This Plugin is included with ESPEasy's [NORMAL] Mega branch (builds after 15.03.2019). The Lolin V2.0 Motor Shield is supported after the 29.09.2020 builds (earlier mega versions only supported the Wemos V1.0 motor shield).
The Plugin's motor control functions are based on the Arduino Motor Shield libraries:
 Wemos V1.0: https://github.com/wemos/WEMOS_Motor_Shield_Arduino_Library
 Lolin V2.0: https://github.com/wemos/LOLIN_I2C_MOTOR_Library
ESP Easy Device Setup
Use the device tab on the ESP Easy web interface and create a new task by editing one of the available tasks.
Select "Motor - Wemos/Lolin Motorshield" from the drop down box.
Enter the Device's Name. Do NOT include spaces or special characters.
Select the Enabled Checkbox.
Enter the Motor Shield's I2C Address (Hex). The Factory Default value is 0x30.
Select the Board Type: Wemos V1.0 or Lolin V2.0
Below is a screenshot of a typical Wemos 1.0 configuration.


Controlling the Motor Shield via HTTP commands
Two DC brushed motors can be controlled by the motor shield. You can control the motors by remote http commands sent from your Home Automation Controller or any other device that can send http get requests.
| Available Command Actions |
|---|
| Forward |
| Backward |
| Stop |
| Brake |
| Standby |
Command Syntax Format:
http://<ESP IP address>/control?cmd=WemosMotorShieldCMD,<Motornumber>,<Action>,<Speed>
or
http://<ESP IP address>/control?cmd=LolinMotorShieldCMD,<Motornumber>,<Action>,<Speed>
Command Keyword:
WemosMotorShieldCMD
LolinMotorShieldCMD
Note: Both keywords are interchangeable.
Motornumber:
0 = Motor A
1 = Motor B
Action:
Forward = Turn on DC Motor, Direction Forward; Requires speed parameter.
Backward = Turn on DC Motor, Direction Backward; Requires speed parameter.
Stop = Turn off DC Motor, no Brake.
Brake = Turn off DC Motor, apply Brake (short commutator).
Standby = Turn off DC Motor and set MotorShield to low power mode.
Note: Brake and Standby actions are not available in Mega builds before Sep-29-2020.
Speed:
0-100
Note: 0% - 100% PWM duty cycle.
Examples:
Note: The examples shown below use the WemosMotorShieldCMD keyword. However, both WemosMotorShieldCMD and LolinMotorShieldCMD command keywords are interchangeable.
Turn on DC Motor, Direction: Forward. Speed is a value from 0-100
http://<ESP IP address>/control?cmd=WemosMotorShieldCMD,0,Forward,99
Stopping the DC Motor:
http://<ESP IP address>/control?cmd=WemosMotorShieldCMD,0,Stop
Controlling the Motor Shield via ESPeasy commands
Go to 'Tools' and enter in command line.
command:
WemosMotorShieldCMD,0,Forward,99
WemosMotorShieldCMD,0,Backward,50
WemosMotorShieldCMD,0,Stop
Rules Example
The Event examples shown below provide basic rules for DoorOpen, DoorClose, and DoorStop. A pair of switches (requires two Switch input - Switch plugins) are used to limit up/down motor travel.
```
//Events
on DoorOpen Do
  WemosMotorShieldCMD,0,Backward,30
endOn
on DoorClose Do
  WemosMotorShieldCMD,0,Forward,30
endOn
on DoorStop Do
  WemosMotorShieldCMD,0,Stop
endOn
---
// Timer for all day open door at time if not open
on Clock#Time=All,07:00 do
  if [Limit1#Switch]!=1
     event,DoorOpen
  else
     event,DoorStop
  endif
endon
// Timer for all day close door at time if not closed
on Clock#Time=All,22:00 do
  if [Limit2]!=1
     event,DoorClose
  else
     event,DoorStop
  endif
endon
```